


 If you’re just starting out in your business, or are ready to get more professional, it’s time to look at how you brand your business. Branding includes everything from your website to your logo to the message you put out on social media sites. You want your branding to be consistent, appealing and professional. Here are five tips to get you started.
Check out our posts for Enterpreneurs!
Showing posts with label Enterpreneurs. Show all posts
Saturday, 25 October 2014
5 Tips For Branding Your Business
If you’re just starting out in your business, or are ready to get more professional, it’s time to look at how you brand your business. Branding includes everything from your website to your logo to the message you put out on social media sites. You want your branding to be consistent, appealing and professional. Here are five tips to get you started.
What to Consider Before Starting a Business

It can be a very compelling and driving force – you’ve got a great idea, a unique service, a fantastic line of recipes, or a can’t-miss product. But launching a business is not the next step…it’s the last step on the road to entrepreneurship. Your time, money, and future are on the line, so take some time to get your ducks in a row and look at the business with a rational eye.
Make a Business Plan
A business depends on a lot more than great products and services to be successful. Like a newborn child, it has its own life force that comes with certain needs and requirements in order for it to survive and thrive. Plan out the structure and processes of your business first. You will need a hierarchy of management, which may be very limited at first. You will need to keep financial records and file taxes. You will need to determine if you should form an “S” corporation, a “C” corporation, or a limited liability corporation (LLC), which could make a big difference in your profitability.Of course you will also need to find a location, design the customer interface (whether it is a store, a website, or a mailing list), price out everything you will need to get set up, and determine the size and scope of your business. You will need to define your demographic so that you can choose the right location and/or target your marketing properly. You will need to research city codes and know what licenses are required.
Making and serving your gourmet lasagna is a very small part of the whole operation, so before you get too far, make sure you are up for all of the other tasks involved and then get things in order.
Importance of Developing Leadership Skills
What makes a good leader? The answer varies widely depending on who you ask, with researchers disagreeing on the critical components that go into the most effective corporate chief. But there are traits they do agree on, including personality components and acquired skills. Some believe even the situation for leadership itself has a bearing on the effectiveness of the leader.

Read More
Important Leadership Skills
- Commitment, resolve and perseverance – driving every aspect of the organization toward a singular unified purpose.
- Risk-taking – breaking conventions and developing new products and services to establish marketplace dominance (and possibly even create a unique market).
- Planning – though a leader typically doesn’t get too involved in the details, he or she must orchestrate a high-level plan that drives everyone toward the unified goal.
- Motivating – an effective leader must be able to encourage contributions from the entire organization, navigating the specific motivators of each individual or group to push the right buttons and inspire employees at every level to achieve not only their personal best but the best for the organization as a whole.
- Communication skills that rely on active listening – far more than just being able to speak and write persuasively, leadership communication skills incite others to work toward the stated goal in line with the path the leader has chosen.
- Possessing or obtaining the skills required to successfully achieve business goals – bringing a unique knowledge set to the table or acquiring it personally or through employees and other subordinates.
What Makes These Individual Skills So Important?
First, a distinction needs to be made: the difference between a leader and a manager. A leader is someone who does the right thing, whereas a manager does things right. Or to put it another way, management is an occupation, leadership is a callingThe Basics of Finance and How it Determines Success
Owning a business can be one of the most rewarding and satisfying ways of meeting financial goals and ensuring that a person’s future is secure and fulfilling. Today’s economy yields many opportunities to people with different skills and strengths. One of the most basic aspects of running a business that is often left by the wayside is that of financial management. Usually only an afterthought, it is the financial management of a company that determines success. The perfect product or service doesn’t mean anything if the money generated goes into the business only to be misused or unaccounted for. Spending the money earned wisely and knowing when to save or invest in growth should be of paramount concern for a business.
Everyone is aware of the fact that most businesses fail within their first year of operation. Often a major contributing factor that leads to failure is poor financial management. A review of the financial information for many failed businesses shows that the business would have actually been quite successful if the owners had just made sound financial decisions in all aspects of the business. It is always recommended to employ the help of a professional like a banking institution, financial planner or accountant. However, a business owner should understand, at the very least, the basic principles regardless of whether a professional is hired or not. This protects the business and the business owner from fraudulent activities. Keeping up to date with the finances and being aware of the principles involved will also beneficially affect other aspects of running a business.

For smaller businesses it may not be practical to hire a professional for all of the financial work, but there several software programs available that help to educate the owner on basic bookkeeping techniques.
A business owner should be familiar and comfortable with using the following:
- Day to day expense tracking – an owner needs to be able create and analyze reports that give an idea of the health of a business.
- Accounts Receivable and Accounts Payable – An owner needs to be able to tell when payment is expected and prepare for any outgoing expenditures
Of equal importance is the ability to determine the current financial state of a business and whether expansion is possible or even necessary due to competition. Being able to identify future trends that can positively or negatively impact a business will go a long way toward helping a business develop staying power in ever shifting market places.
Regardless of the size of a business, the goals of the business and the owner should be kept firmly in mind. While smaller businesses may not immediately benefit or be able to afford an accountant that is an expense that should be worked into a budget as soon as possible. Accountants and even financial planners are able to keep a business on track. They can help to establish realistic long-term goals to increase the chances of success. With the help of a financial professional, cash flow problems can be spotted and tackled.
Tips for Food Start Ups
So you still want to start a food business, despite the obstacles? Here are four things to consider:
1. Amateurish packaging won't cut it.
This is where many artisan food makers fall down. You spend so much time getting your bacon-caramel sea salt truffles to taste great that you barely consider what it'll look like on a store shelf. "If you make the best chocolate bar ever, but you're packaging it in a little bag that falls over on the shelf and breaks every day, there is no way we'll put that in the store," says Alli Ball, assistant grocery buyer at Bi-Rite Market in San Francisco. "Packaging and labeling has to be attractive and interesting."
Emily Olson, cofounder of the specialty food subscription service Foodzie, agrees that "unprofessional" packaging is the downfall of many. "If it's in a plastic bag, you wonder, 'Is this safe enough to eat?'"
 "The packaging helps you trust what you purchased," continues Olson. "You can't run a business just by delighting people with good food. It has to look good too. And since we ship, it has to arrive in good shape; the owner has to have put thought into how it will travel. If someone sends a sample to us that's broken, we know we can't buy it."
2. Fill a market gap.
It's easier to sell a unique product than one that's similar to many others. Sure, your grandma's macaroon recipe is the best ever! Problem is the customer, surveying a shelf of macaroon brands, doesn't know that.
"It's a pretty basic part of a business plan," says Caleb Zigas, executive director of San Francisco business incubator La Cocina, "to stand in a grocery store and evaluate competitor products. You can't be a successful entrepreneur if you can't identify a market for your product."
Olson thinks the baked-good space is particularly crowded: "I think it's mostly that those are easy to make in your home kitchen," she says. "You'd have to be unique and really special to stand out." But she has noticed a lack of terrific basic jams. "People get creative with them, which is good, there's room for creativity. But they put in too much sugar, too many ingredients. There's room out there for jams that are just one or two ingredients and that preserve wonderful fruit."
3. Develop retail pricing savvy.
It's easy to cringe with Ball when she describes small producers who tell her they've been selling jam at farmers' markets for $10 a jar, so they'd like her to pay $9. "I can't do that!" Ball says. "I will have to price the jam at $11 and no one's going to buy it."
"Whole Foods won't take a product unless they can mark it up 50 percent," Zigas says. The right strategy is to figure out what the retail price should be, then work backwards. A 5- to 7-percent margin of profit is about right, he says. That price, naturally, has to take into account every single aspect of production and delivery, including the cost of ingredients, and (this is important) paying yourself. "A lot of new businesspeople forget that," Zigas says.
Of course, you'll have to account for scale. If you start making more product, where will you source your ingredients? Do production? Will you hire help? What about delivering to stores?
4. Research ingredient requirements.
Buyers of artisan products expect them to have high-quality standards. "At a basic minimum, we sell nothing with artificial ingredients, artificial coloring, high-fructose corn syrup, or artificial preservatives," recites Ball in a practiced tone. "If your food has animal products in it, they cannot have hormones or antibiotics." The rules at Whole Foods are similar. Would-be artisans routinely come into Bi-Rite bearing foods made with random ingredients bought from Amazon, or small amounts of food coloring. It won't fly.
It's tough: You're expected to make food with quality ingredients while keeping prices down. That's why not everyone makes it. But some do. The experts we talked with all know plenty of people making a living from food—it can be done. It's just a lot harder than it looks.
Credits to www.chow.com
How to bake a loaf of bread
This article is presented by Farmgirl
This is by no means a
comprehensive lesson on bread baking, or even a basic introduction. If you've
never baked a loaf of bread in your life, I recommend you begin by making pizza
dough. Click here for my simple recipe.

Farmhouse White Sandwich Bread (recipe here)
From there, I suggest trying my popular Farmhouse White Sandwich Bread, which is a classic, basic loaf that's perfect for beginning bread bakers. And once you're comfortable with the basic formula you can go on to experiment by adding various other ingredients to the dough (the recipe post includes several suggestions).
If you're ready to try making crusty, European-style loaves such as the ones pictured above—or if you're looking for ways to improve the breads you're already making—I offer you these tips.
Farmhouse White Sandwich Bread (recipe here)
From there, I suggest trying my popular Farmhouse White Sandwich Bread, which is a classic, basic loaf that's perfect for beginning bread bakers. And once you're comfortable with the basic formula you can go on to experiment by adding various other ingredients to the dough (the recipe post includes several suggestions).
If you're ready to try making crusty, European-style loaves such as the ones pictured above—or if you're looking for ways to improve the breads you're already making—I offer you these tips.
They're not deep, dark
secrets. They're not magic tricks. They're simply ten things that made my breads
better and resulted in the loaves you see here.

Even the covers of these bread baking cookbooks are inspiring.
1. Do some
reading.
Just don't overdo it. Pick one bread book and read it from cover to cover. If you like it and it makes sense to you, read it again. Then try a recipe. If you like the result—or if it came out terrible but you know it has potential—make it again. And again and again and again.
I believe that it's better to make one bread 10 times than to make 10 breads one time. You can't get to know a bread by making it only once.
Just don't overdo it. Pick one bread book and read it from cover to cover. If you like it and it makes sense to you, read it again. Then try a recipe. If you like the result—or if it came out terrible but you know it has potential—make it again. And again and again and again.
I believe that it's better to make one bread 10 times than to make 10 breads one time. You can't get to know a bread by making it only once.
I have a pile of cookbooks
devoted to bread, but the only one that lives in my kitchen is Bread Alone by Daniel Leader. I've turned to it so many times
it's now in about four pieces. It's a wonderful book, full of everything from
detailed information on ingredients and mouthwatering recipes (and photos) to
stories about visiting an organic grain grower and starting the Bread Alone bakery in upstate New
York.
It's easy to read, and the recipes are accessible even to a beginner. At first it may seem daunting, but it's not. Start with his learning loaves and move on from there. After 20 years this book is still in print, and for good reason.
Update: Daniel Leader's latest book, Local Breads: Sourdough and Whole-Grain Recipes from Europe's Best Artisan Bakers, is fabulous. It's the culmination of dozens of trips to Europe over the past two decades in search of bakers who are still using time-honored methods and ingredients to create loaves unique to their towns and cities.
Part travelogue, part bread making class, and part gastronomic history lesson, the book is full of colorful stories of local artisans and their authentic treasured recipes, many of which have been shared for the first time, and all of which have been translated by Daniel for American home bakers. I love it even more than Bread Alone.
Another excellent bread book also comes from a New York bakery. Amy's Bread, Revised and Updated: Artisan-Style Breads, Sandiwches, Pizzas, and More from new York City's Favorite Bakery is packed with useful information (especially for beginners) and offers recipes for tempting loaves of all kinds and all degrees of difficulty.
Artisan Baking Across America is a gorgeous book "to bake from, to learn from, to read for the sheer pleasure of realizing the devotion and mastery that go into the making of our best daily bread." It includes stunning photographs, intimate portraits of all kinds of artisan bread bakeries and bakers, and some of their best recipes.
Bernard Clayton's New Complete Book Of Breads offers over 300 recipes for every type of bread you can imagine, and each recipe includes instructions for making the dough with your hands, an electric mixer, and a food processor. The recipe for pita bread alone was worth the price of the book.
It's easy to read, and the recipes are accessible even to a beginner. At first it may seem daunting, but it's not. Start with his learning loaves and move on from there. After 20 years this book is still in print, and for good reason.
Update: Daniel Leader's latest book, Local Breads: Sourdough and Whole-Grain Recipes from Europe's Best Artisan Bakers, is fabulous. It's the culmination of dozens of trips to Europe over the past two decades in search of bakers who are still using time-honored methods and ingredients to create loaves unique to their towns and cities.
Part travelogue, part bread making class, and part gastronomic history lesson, the book is full of colorful stories of local artisans and their authentic treasured recipes, many of which have been shared for the first time, and all of which have been translated by Daniel for American home bakers. I love it even more than Bread Alone.
If you're a beginning bread baker,
the beautiful step by step color photos and general information in Bread:
Artisan Breads from Baguettes and Bagels to Focaccia and Brioche can
help demystify the whole bread baking process, while inspiring you to start
kneading. I really like the Italian
Rosemary Raisin Bread, and my Carrot
Herb Rolls (made with fresh herbs and lots of shredded carrots) are
adapted from Bread.
The stuffed focaccia is really good.
Another excellent bread book also comes from a New York bakery. Amy's Bread, Revised and Updated: Artisan-Style Breads, Sandiwches, Pizzas, and More from new York City's Favorite Bakery is packed with useful information (especially for beginners) and offers recipes for tempting loaves of all kinds and all degrees of difficulty.
Artisan Baking Across America is a gorgeous book "to bake from, to learn from, to read for the sheer pleasure of realizing the devotion and mastery that go into the making of our best daily bread." It includes stunning photographs, intimate portraits of all kinds of artisan bread bakeries and bakers, and some of their best recipes.
Bernard Clayton's New Complete Book Of Breads offers over 300 recipes for every type of bread you can imagine, and each recipe includes instructions for making the dough with your hands, an electric mixer, and a food processor. The recipe for pita bread alone was worth the price of the book.
Bread in novels:
There's another book called
Bread Alone. It's a quiet novel written by my good friend Judi
Hendricks, and it, too, is wonderful. Much of the story takes place in a Seattle
bakery, and Judi confided in me that she loves Daniel Leader's Bread
Alone so much she named her novel after it.
I've read itat least three five or six times, and it always inspires me to bake
bread. The sequel, The Baker's Apprentice is a delicious read as well.
Yet another similarly titled book is Sarah-Kate Lynch's By Bread Alone, a quirky novel I enjoy re-reading every couple of years.

Oatmeal Toasting Bread 'Old' Dough (oatmeal bread recipe here)
3. Use a sourdough starter or a sponge or a poolish or a lump of old dough.
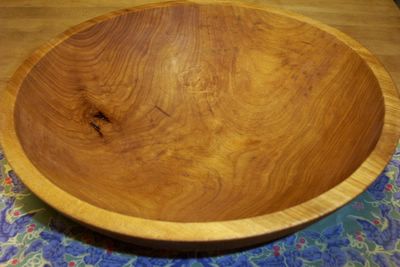
This is the bread baker's equivalent of the cast iron skillet. The more you mix and rise your dough in it, the more seasoned it becomes. Clean it with only a plastic scraper and a damp cloth. Wash it with water if you must, but never use soap (though if you buy a used wooden bowl, you'll need to clean it thoroughly with soapy water and soak it briefly in a mild bleach solution before the first use).
Old yeast cells will survive in the bowl, enhancing fermentation and building flavor in your doughs.
To keep your loaves (and pizzas) from sticking to the peel when you slide them into the oven, lay a piece of unbleached parchment paper on the peel before turning the loaves onto it, then slide the loaves and the parchment into the oven.
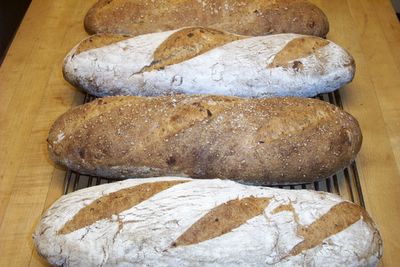
This is how you get that pretty white pattern on the tops of your loaves (the dark parts are where the crust "bloomed" after it was scored just before putting it into the oven). And, more importantly, your crusts will be thicker and bolder because extra flour will have embedded itself in the dough while it was rising.
Freshly baked Oatmeal Toasting Bread (recipe here)
I used to be really bad about doing this, but I now find it indispensable. Each time you bake bread, simply take a few minutes to write down everything you did, from the amount of ingredients you used to the length of each rise, to how the finished bread looked and tasted. The more detailed your notes, the better.
There are so many things that can affect your bread baking; everything from the brand of flour to the weather can make a difference in how your bread comes out. For instance, when it's cloudy because of a low pressure system in the area, bread dough actually rises more quickly because it has less atmospheric pressure on it. Taking notes allows you to not only look back and see what worked and what didn't, but also helps you figure out why.
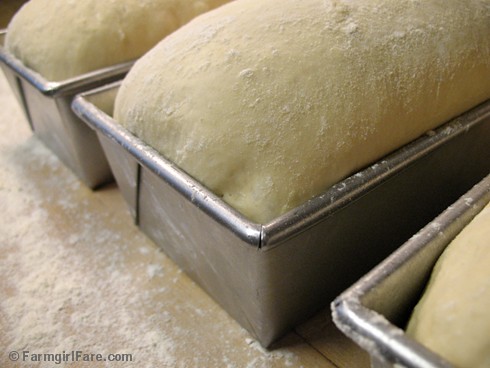
Farmhouse White ready for the oven (recipe here)
Each time I bake bread, even if I'm making my Farmhouse White for the 200th time, I pull out one of my bread notebooks and make detailed notes about the entire process. I also record the indoor temperature and humidity, the outdoor temperature, what the weather is like, and any other variables I can think of. This information can be especially helpful for the breads you don't bake very often.

Honey Whole Grain Bread baked using tips 2,5,6,7, and 9
(For sandwich loaves, I love my Chicago Metallic commercial loaf pans)
13. And finally: Practice, practice, practice.
There is nothing that will improve your breads more than simply making them over and over again. And the best part is, there is nothing that will thrill your friends and loved ones more than receiving the results of your bread baking efforts.
So that's all there is to it. Just take these tips with you into the kitchen, and in no time at all you should be hearing those sweet, magic words, "This is the best bread I've ever tasted!"
I've read it
Yet another similarly titled book is Sarah-Kate Lynch's By Bread Alone, a quirky novel I enjoy re-reading every couple of years.
2. Start with the best
ingredients.
Depending on your point of
view, this may sound either completely obvious or totally unnecessary. Flour is
flour, right? Water is water? But when you are creating something with only four
basic ingredients (flour, water, salt, yeast), the quality of those ingredients
is crucial.
Wheat that is grown in dead soil and doused with chemical pesticides and herbicides, then sprayed with more pesticides once it's been harvested and is sitting in storage so it doesn't get bugs in it (yes, this is what is often done), and then highly processed and chemically bleached so that it's nice and white—this flour will never give you great bread.
Wheat that is grown in dead soil and doused with chemical pesticides and herbicides, then sprayed with more pesticides once it's been harvested and is sitting in storage so it doesn't get bugs in it (yes, this is what is often done), and then highly processed and chemically bleached so that it's nice and white—this flour will never give you great bread.
Organic flour is
the way to go. Stoneground if possible. It's hard to find stoneground white
flour, but Heartland Mill produces their white flours using equipment that
is very kind to the wheat. I use organic bread flour (sometimes called
high-gluten flour) for sourdough loaves, pizza
dough, and combined with organic all-purpose flour in other breads
like Farmhouse
White.
Water should be
pure. My water comes from a spring-fed, 300-foot deep well (actually 600 feet
deep if you figure we're already 300 feet down in a valley). It's run through a
large outdoor filter, and then I filter it again once it comes out of the tap.
Municipal tap water is full of chlorine and often other contaminants. These do
not make good bread.
Salt is a chic
ingredient these days, and some of it is incredibly expensive. There are many
natural alternatives to common table salt, which is pretty nasty stuff. Sea salt
is nice, but it can be heavily processed, and some people recomment not using
any sort of sea salt since our oceans have become so polluted. Kosher salt, a
coarse salt which can come from either mines or the sea, contains no
additives.
Look around, see what you can find, what you like the taste of, and experiment with it.
Look around, see what you can find, what you like the taste of, and experiment with it.
Yeast is always a
topic of hot debate among bread bakers. Some highly respected professionals
swear by "instant" yeast—which can be mixed right into the dry ingredients—while
others refuse to even utter the words.
Fresh yeast is another hot topic; again, some people swear by it, while others say it's too much trouble as it doesn't stay fresh for long and can be hard to find. I've never baked with it. My sourdough loaves don't use any added yeast. Once you have a sourdough starter, that's all you need.
Fresh yeast is another hot topic; again, some people swear by it, while others say it's too much trouble as it doesn't stay fresh for long and can be hard to find. I've never baked with it. My sourdough loaves don't use any added yeast. Once you have a sourdough starter, that's all you need.
If you do use yeast, make
sure that it's alive—no matter what kind. I use instant yeast, which I buy in
economical
one pound bags . I store it in the freezer where it keeps for over a
year, though others say it won't, and still others say you should never, ever
freeze yeast; see how it can get really confusing?
You can read more about the different types of yeast available here.
You can read more about the different types of yeast available here.
Oatmeal Toasting Bread 'Old' Dough (oatmeal bread recipe here)
3. Use a sourdough starter or a sponge or a poolish or a lump of old dough.
There are all different
types of 'starters.' Some are made in a few hours, some in a few days, and some
live in your fridge forever.
If you make bread two days in a row, you can just save a lump of dough from the first batch and mix it into the second, or you can freeze it for another time, like the Oatmeal Toasting Bread dough pictured above.
Any kind of starter will vastly improve the crust, crumb, and flavor of your loaves. It's simply a matter of finding which one works for you. I've had my two sourdough starters ('regular' and rye) for nearly four years. The older they get, the better they make your bread. I made them using the directions in Bread Alone.
If you make bread two days in a row, you can just save a lump of dough from the first batch and mix it into the second, or you can freeze it for another time, like the Oatmeal Toasting Bread dough pictured above.
Any kind of starter will vastly improve the crust, crumb, and flavor of your loaves. It's simply a matter of finding which one works for you. I've had my two sourdough starters ('regular' and rye) for nearly four years. The older they get, the better they make your bread. I made them using the directions in Bread Alone.
4. Find a wooden dough
bowl and use it forever.
Update: While I still love using
my wooden bowls, most of the time I now let my dough ferment (the first rise) in
a straight-sided
food grade plastic container with a snap-on lid, which makes it easy to
see when the dough has doubled in size. There's no need to grease or flour the
container.
This is the bread baker's equivalent of the cast iron skillet. The more you mix and rise your dough in it, the more seasoned it becomes. Clean it with only a plastic scraper and a damp cloth. Wash it with water if you must, but never use soap (though if you buy a used wooden bowl, you'll need to clean it thoroughly with soapy water and soak it briefly in a mild bleach solution before the first use).
Old yeast cells will survive in the bowl, enhancing fermentation and building flavor in your doughs.
I've been using the same
antique wooden bowl for a dozen years. It's four inches high and about 13 inches
from rim to rim. It will hold enough dough to make three good-sized loaves.
Every so often I take a cloth and rub almond
oil or food
grade mineral oil into the wood to keep it from drying out. It
should really be done once a month. You can also use almond oil and mineral oil
on wood cutting boards and rolling pins.
New wooden bowls are available in various sizes, or you might luck out and find one at an antiques store or flea market or on ebay. Old bowls are often very pricey though, because decorators and antiques collectors love them.
If you want to buy a new wooden bowl, I would check out The Bowl Mill in Vermont. I haven't purchased any of their bowls, but they appear to be of superior quality and workmanship. If treated properly, a wooden dough bowl should last for many years.
Whether you decide to buy a new wooden bowl or an old one, remember that you don't want one that has been painted or stained or is cracked.
New wooden bowls are available in various sizes, or you might luck out and find one at an antiques store or flea market or on ebay. Old bowls are often very pricey though, because decorators and antiques collectors love them.
If you want to buy a new wooden bowl, I would check out The Bowl Mill in Vermont. I haven't purchased any of their bowls, but they appear to be of superior quality and workmanship. If treated properly, a wooden dough bowl should last for many years.
Whether you decide to buy a new wooden bowl or an old one, remember that you don't want one that has been painted or stained or is cracked.
5. Sprinkle in the
flour and stir like crazy.
When you're mixing up your
dough, add only about a handful of flour at a time. Use your whole arm to stir,
making wide sweeping motions (I use a wooden spoon.) This will "whip" the dough
and allow the gluten to develop.
This technique works best with a wide, shallow bowl. Take several minutes to mix in all the flour, saving one cup to add while kneading. Then turn the bread out onto a floured surface and begin kneading it.
This technique works best with a wide, shallow bowl. Take several minutes to mix in all the flour, saving one cup to add while kneading. Then turn the bread out onto a floured surface and begin kneading it.
6. Give it a rest and
then add the salt.
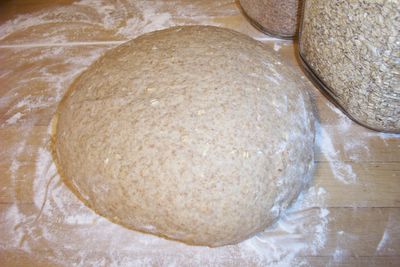
Honey whole grain dough ready for a little rest
Honey whole grain dough ready for a little rest
This tip not only greatly
improves nearly any type of bread, but it also allows you to decrease your
kneading time (which improves the bread even more). Autolyse (pronounced
AUTO-lees and used as both a noun and a verb) is a French word that refers to a
rest period given to dough during the kneading process.
When making your dough,
mix together only the water, yeast, flour, and grains until it forms a shaggy
mass. Knead it for several minutes, and then cover the dough and let it rest for
20 minutes. I simply leave the dough on the floured counter and put my wooden
bowl over it.
During this time, the gluten will relax and the dough will absorb more water, smoothing itself out so that it is moist and easier to shape. After the autolyse, knead the dough for several more minutes, mixing in any other ingredients such as herbs or nuts or dried fruit.
Since salt causes gluten to tighten, hindering its development and hydration, it should not be added to the dough until after the autolyse. And if you're using the "old dough" method (where you add a lump of finished dough from a previous batch of bread to your new dough rather than use a sponge or starter), do not mix it in until after the autolyse either, as it contains salt.
When you incorporate an autolyse into your bread baking, you will be rewarded with loaves that have greater volume and a creamier colored crumb, as well as more aroma and sweet wheat flavor. They will also look nicer and taste better. Bread doughs that contain a high proportion of white flour will benefit the most from an autolyse.
During this time, the gluten will relax and the dough will absorb more water, smoothing itself out so that it is moist and easier to shape. After the autolyse, knead the dough for several more minutes, mixing in any other ingredients such as herbs or nuts or dried fruit.
Since salt causes gluten to tighten, hindering its development and hydration, it should not be added to the dough until after the autolyse. And if you're using the "old dough" method (where you add a lump of finished dough from a previous batch of bread to your new dough rather than use a sponge or starter), do not mix it in until after the autolyse either, as it contains salt.
When you incorporate an autolyse into your bread baking, you will be rewarded with loaves that have greater volume and a creamier colored crumb, as well as more aroma and sweet wheat flavor. They will also look nicer and taste better. Bread doughs that contain a high proportion of white flour will benefit the most from an autolyse.
7. Keep the temperature
low & the rise slow.
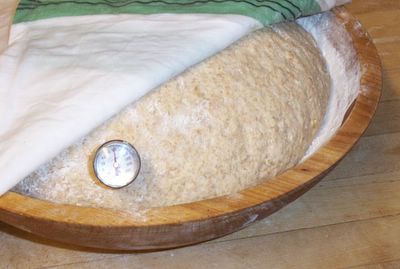
Taking the dough's temperature before the first rise
Taking the dough's temperature before the first rise
The fundamental art of
bread baking can easily turn into a scientific study full of confusing technical
jargon and complicated explanations. Since this is only an article and not an
entire book, I am going to simply skip straight to the bottom line with this
tip: the longer your dough is allowed to rise, the better your bread will
be.
The two ways to extend
rising times are by adjusting the temperature of the dough and the amount of
yeast you put in it. The lower the temperature, the slower the rise. The less
yeast used, the slower the rise.
Crusty, European-style breads often rise for many hours. For example, the sourdough breads I make contain no added yeast at all, only the sourdough starter—actually called a chef—that lives in my refrigerator.
Crusty, European-style breads often rise for many hours. For example, the sourdough breads I make contain no added yeast at all, only the sourdough starter—actually called a chef—that lives in my refrigerator.
The night before I plan to
bake bread, I mix the chef with flour and water and set it in a place
that is about 70° Farenheit for 8-10 hours. The next day, this mixture becomes
the base for my finished dough, which will rise for a total of another five to
six hours before it is finally baked.
Many bakers agree that the ideal room temperature for bread dough to rise is between 70° and 75°. If you're baking in a kitchen that is cooler than 70°, you can easily raise the temperature of your dough by using warm or hot water (or milk)—or just let it rise a little slower, which will improve your loaves. Keep in mind that kneading the dough will also increase its temperature by a few degrees.
Many bakers agree that the ideal room temperature for bread dough to rise is between 70° and 75°. If you're baking in a kitchen that is cooler than 70°, you can easily raise the temperature of your dough by using warm or hot water (or milk)—or just let it rise a little slower, which will improve your loaves. Keep in mind that kneading the dough will also increase its temperature by a few degrees.
If the air in your kitchen
is above 75°, you can use cold water in your dough (and can hopefully find a
cooler place to let it rise). Storing your flours in the freezer is another way
to lower the temperature of your dough, and it will also keep whole grain flours
fresher.
An instant read thermometer, like the one pictured above, is a handy item to have for taking water, flour, and dough temperatures, and it's indispensible if you're a serious bread baker. You can buy one for about $5.00. Inexpensive digital thermometers are also available for under $15.00.
Using less yeast than is called for in a recipe will allow the dough to rise for a longer period of time. A basic rule you can apply to nearly any bread recipe is to simply use half the yeast and double the rising time. You may have to make adjustments, but this is a good place to start.
By doing just this one thing, you should see a great improvement in your breads. They'll have more grain flavor, a nice, dense crumb with irregular air pockets, and a pleasant chewiness.
8. Catch yourself a Couche.

Pain Au Levain rising in my homemade couche
An instant read thermometer, like the one pictured above, is a handy item to have for taking water, flour, and dough temperatures, and it's indispensible if you're a serious bread baker. You can buy one for about $5.00. Inexpensive digital thermometers are also available for under $15.00.
Using less yeast than is called for in a recipe will allow the dough to rise for a longer period of time. A basic rule you can apply to nearly any bread recipe is to simply use half the yeast and double the rising time. You may have to make adjustments, but this is a good place to start.
By doing just this one thing, you should see a great improvement in your breads. They'll have more grain flavor, a nice, dense crumb with irregular air pockets, and a pleasant chewiness.
8. Catch yourself a Couche.
Pain Au Levain rising in my homemade couche
Couche is the
French word for "couch" or "resting place." In the bread baking world, a
couche is a piece of heavy canvas that is dusted with flour and used to
support freestanding loaves, such as rolls and baguettes, while they are
proofing. (When making bread, the second rise—after the loaves have been
shaped—is referred to as the "proofing" phase. The first rise is the
"fermentation.") As you can see in the photo, the couche cradles the
loaves, keeping them straight and preventing them from sticking
together.
Couches made of special havey baker's canvas can be purchased from commercial bakery suppliers. My couche is made from a yard of raw canvas I bought several years ago at a fabric store for about $4.00. Before using it the first time, I washed it in hot water (without any detergent) to remove any sizing from the material. Since then, I have simply shaken it out well after each use. If you do need to wash your couche, use cold water (so the flour doesn't turn to glue) and no detergent.
You can place your couche either directly on a counter or on a large baking sheet (I can't imagine life without my commercial half-size sheet pans) if you need to move the loaves somewhere else to rise. Sprinkle it generously with flour and rub the flour into the canvas. Long loaves such as torpedoes or baguettes should be placed in the couche seam side up.
Couches made of special havey baker's canvas can be purchased from commercial bakery suppliers. My couche is made from a yard of raw canvas I bought several years ago at a fabric store for about $4.00. Before using it the first time, I washed it in hot water (without any detergent) to remove any sizing from the material. Since then, I have simply shaken it out well after each use. If you do need to wash your couche, use cold water (so the flour doesn't turn to glue) and no detergent.
You can place your couche either directly on a counter or on a large baking sheet (I can't imagine life without my commercial half-size sheet pans) if you need to move the loaves somewhere else to rise. Sprinkle it generously with flour and rub the flour into the canvas. Long loaves such as torpedoes or baguettes should be placed in the couche seam side up.
When you're ready to put
the loaves into the oven, flip them over onto your baker's
peel (or an upside down,
large rimmed baking sheet) so that the seam is on the bottom and the floured
side is facing up. I have several different peels and prefer the wood-handled
aluminum ones the best. The thin metal easily slides under the
crusts; I recommend buying the largest size you can.
To keep your loaves (and pizzas) from sticking to the peel when you slide them into the oven, lay a piece of unbleached parchment paper on the peel before turning the loaves onto it, then slide the loaves and the parchment into the oven.
This is how you get that pretty white pattern on the tops of your loaves (the dark parts are where the crust "bloomed" after it was scored just before putting it into the oven). And, more importantly, your crusts will be thicker and bolder because extra flour will have embedded itself in the dough while it was rising.
9. Turn your oven into
a stone hearth.
A baking
stone will simulate a stone hearth in your oven and is a must if you
are trying to bake crusty, freeform loaves. (It's also the secret to making
fantastic homemade
pizza.) It will allow your
breads to bake more evenly, and the initial, intense burst of heat on the cold
dough will help to create high, richly colored loaves and chewy, better-tasting
crusts.
There are many shapes and sizes and thicknesses of pizza or baking stones available. Be sure to choose one that leaves a 2- to 3-inch gap of space on all sides in your oven so air can circulate. My baking stone is 14"x15" and about 3/4" thick (similar to this one), and I've had it for 18 years. It's now dark and seasoned. After each use, I just brush it off. If you need to wash yours, use only water, never soap.
You should season a new baking stone by heating it once or twice in a moderate oven before using it. When making bread or pizza, always allow your baking stone to preheat in the oven for at least 45 minutes so that it's nice and hot.
I find that placing my baking stone on a rack in the center of my oven gives me evenly baked breads. If the bottoms of your breads are burning before the tops are brown, or vice versa, try placing your baking stone on a lower or higher oven rack. For pizzas I place the baking stone on the lowest oven rack and crank up the heat to 500 degrees.
There are many shapes and sizes and thicknesses of pizza or baking stones available. Be sure to choose one that leaves a 2- to 3-inch gap of space on all sides in your oven so air can circulate. My baking stone is 14"x15" and about 3/4" thick (similar to this one), and I've had it for 18 years. It's now dark and seasoned. After each use, I just brush it off. If you need to wash yours, use only water, never soap.
You should season a new baking stone by heating it once or twice in a moderate oven before using it. When making bread or pizza, always allow your baking stone to preheat in the oven for at least 45 minutes so that it's nice and hot.
I find that placing my baking stone on a rack in the center of my oven gives me evenly baked breads. If the bottoms of your breads are burning before the tops are brown, or vice versa, try placing your baking stone on a lower or higher oven rack. For pizzas I place the baking stone on the lowest oven rack and crank up the heat to 500 degrees.
Freshly baked Oatmeal Toasting Bread (recipe here)
2009
Update: A few years ago I started baking all of my pan loaves on my
baking
stone. I place the cold stone in the cold oven like usual, let the
oven heat up, and then put the loaf pans full of risen dough directly on the hot
baking stone. I really like the results, and the loaves are nice and brown on
the bottoms and sides.
Heavy duty commercial loaf pans really make a difference. I really like Chicago Metallic pans (shown above) and USA Pans.
10. Make some steam.
Have you ever wondered how some European-style breads get that gorgeous, glossy shine on their crusts—and why your loaves never turn out looking like that? Well, they can. All you need to do is fill up your oven with steam during the first part of baking.
Steam slows crust formation, which allows for the best possible oven "spring." It also gelatinizes the starch on the surface of the bread so that it develops a thin, glossy, beautifully brown crust.
There are two easy ways to create steam in your oven. One is to fill an inexpensive plastic spray bottle with water and mist the walls and floor of the oven for several seconds right after you put the bread in. Repeat this two more times at two or three minute intervals. (Warning: Do not spray the oven light! It makes a really big mess when it shatters.)
Try to open the oven door as little as possible when you're misting so that you don't lose all your valuable heat. You can set your oven 25 to 50 degrees higher than you need it to be to adjust for the heat loss while misting, and then just turn down the temperature once you're finished.
As long as your loaves do not have a decorative flour pattern on them (like the sourdough onion rye bread shown above), you can directly mist the dough as well. Or you can use a pastry brush to paint them with water before putting them in the oven.
The other way to create steam in your oven is by carefully pouring about a cup of hot water into a preheated pan you have set on a rack underneath your baking stone. Do this right after you have put your bread in the oven. Use a wide, shallow, old metal pan or a cast iron skillet.
Do not use your favorite Corningware stoneware roasting pan, even though it's the perfect size. It will end up badly cracked, and you will end up in tears. If desired, you can also directly mist the loaves and oven walls at the beginning of the baking process when you use this method.
2009 Update: I rarely bother with the steam anymore, and I really haven't seen much (if any) difference in my breads. When I do want to create steam, I follow this tip from Daniel Leader's awesome book, Local Breads: Before you turn the oven on, place a cast iron skillet (one of the best kitchen bargains on the planet) on the rack below your baking stone. After you slide your unbaked loaves onto the hot baking stone, toss a handful of ice cubes into the hot cast iron skillet and quickly shut the oven door.
Oh, let's just make it an even baker's dozen tips!
11. Storing your edible masterpiece. Once you've baked a delicious loaf, you'll want it to stay as fresh as possible (assuming it lasts more than a few hours). Crusty loaves will keep best if you leave them unwrapped at room temperature.
You can store them, cut side down, in a breadbox or a cupboard or even on the kitchen counter. To re-crisp the crust, mist your bread with water and reheat it in a 400° oven for 5 to 8 minutes.
I store sandwich-style pan loaves in plastic bags at room temperature, but only for a couple of days. If the bread is whole grain, I usually leave the bag partly open. During our hot and humid Missouri summers I keep them in the fridge, which will make some people cringe, but I always toast refrigerated bread.
If you're not planning to eat your bread right away, consider freezing it. Bread freezes beautifully. I always bake several loaves at a time, no matter what kind of bread I'm making; there's no reason to go to all that effort for just one loaf.
I simply put whole or half loaves in heavy-duty freezer bags and toss them in the chest feezer, though some people recommend wrapping each loaf in aluminum foil first. You can defrost frozen bread at room temperature, or you can go straight from freezer to oven. For baguettes and large sandwich loaves (and all sorts of other things), I love these 2-gallon and 2.5-gallon jumbo zipper bags, which I wash and reuse over and over.
12. Write everything down.

Heavy duty commercial loaf pans really make a difference. I really like Chicago Metallic pans (shown above) and USA Pans.
10. Make some steam.
Have you ever wondered how some European-style breads get that gorgeous, glossy shine on their crusts—and why your loaves never turn out looking like that? Well, they can. All you need to do is fill up your oven with steam during the first part of baking.
Steam slows crust formation, which allows for the best possible oven "spring." It also gelatinizes the starch on the surface of the bread so that it develops a thin, glossy, beautifully brown crust.
There are two easy ways to create steam in your oven. One is to fill an inexpensive plastic spray bottle with water and mist the walls and floor of the oven for several seconds right after you put the bread in. Repeat this two more times at two or three minute intervals. (Warning: Do not spray the oven light! It makes a really big mess when it shatters.)
Try to open the oven door as little as possible when you're misting so that you don't lose all your valuable heat. You can set your oven 25 to 50 degrees higher than you need it to be to adjust for the heat loss while misting, and then just turn down the temperature once you're finished.
As long as your loaves do not have a decorative flour pattern on them (like the sourdough onion rye bread shown above), you can directly mist the dough as well. Or you can use a pastry brush to paint them with water before putting them in the oven.
The other way to create steam in your oven is by carefully pouring about a cup of hot water into a preheated pan you have set on a rack underneath your baking stone. Do this right after you have put your bread in the oven. Use a wide, shallow, old metal pan or a cast iron skillet.
Do not use your favorite Corningware stoneware roasting pan, even though it's the perfect size. It will end up badly cracked, and you will end up in tears. If desired, you can also directly mist the loaves and oven walls at the beginning of the baking process when you use this method.
2009 Update: I rarely bother with the steam anymore, and I really haven't seen much (if any) difference in my breads. When I do want to create steam, I follow this tip from Daniel Leader's awesome book, Local Breads: Before you turn the oven on, place a cast iron skillet (one of the best kitchen bargains on the planet) on the rack below your baking stone. After you slide your unbaked loaves onto the hot baking stone, toss a handful of ice cubes into the hot cast iron skillet and quickly shut the oven door.
Oh, let's just make it an even baker's dozen tips!
11. Storing your edible masterpiece. Once you've baked a delicious loaf, you'll want it to stay as fresh as possible (assuming it lasts more than a few hours). Crusty loaves will keep best if you leave them unwrapped at room temperature.
You can store them, cut side down, in a breadbox or a cupboard or even on the kitchen counter. To re-crisp the crust, mist your bread with water and reheat it in a 400° oven for 5 to 8 minutes.
I store sandwich-style pan loaves in plastic bags at room temperature, but only for a couple of days. If the bread is whole grain, I usually leave the bag partly open. During our hot and humid Missouri summers I keep them in the fridge, which will make some people cringe, but I always toast refrigerated bread.
If you're not planning to eat your bread right away, consider freezing it. Bread freezes beautifully. I always bake several loaves at a time, no matter what kind of bread I'm making; there's no reason to go to all that effort for just one loaf.
I simply put whole or half loaves in heavy-duty freezer bags and toss them in the chest feezer, though some people recommend wrapping each loaf in aluminum foil first. You can defrost frozen bread at room temperature, or you can go straight from freezer to oven. For baguettes and large sandwich loaves (and all sorts of other things), I love these 2-gallon and 2.5-gallon jumbo zipper bags, which I wash and reuse over and over.
12. Write everything down.
I used to be really bad about doing this, but I now find it indispensable. Each time you bake bread, simply take a few minutes to write down everything you did, from the amount of ingredients you used to the length of each rise, to how the finished bread looked and tasted. The more detailed your notes, the better.
There are so many things that can affect your bread baking; everything from the brand of flour to the weather can make a difference in how your bread comes out. For instance, when it's cloudy because of a low pressure system in the area, bread dough actually rises more quickly because it has less atmospheric pressure on it. Taking notes allows you to not only look back and see what worked and what didn't, but also helps you figure out why.
Farmhouse White ready for the oven (recipe here)
Each time I bake bread, even if I'm making my Farmhouse White for the 200th time, I pull out one of my bread notebooks and make detailed notes about the entire process. I also record the indoor temperature and humidity, the outdoor temperature, what the weather is like, and any other variables I can think of. This information can be especially helpful for the breads you don't bake very often.
Honey Whole Grain Bread baked using tips 2,5,6,7, and 9
(For sandwich loaves, I love my Chicago Metallic commercial loaf pans)
13. And finally: Practice, practice, practice.
There is nothing that will improve your breads more than simply making them over and over again. And the best part is, there is nothing that will thrill your friends and loved ones more than receiving the results of your bread baking efforts.
So that's all there is to it. Just take these tips with you into the kitchen, and in no time at all you should be hearing those sweet, magic words, "This is the best bread I've ever tasted!"
Credits to FarmgirlFare
Friday, 24 October 2014
Subscribe to:
Posts (Atom)